Password Recovery Procedure for the Catalyst Layer 2 Fixed Configuration and 3550 Series Switches
In preparation of our CCNP exam, we want to make sure we cover the various concepts that we could see on our Cisco CCNP exam. So to assist you, below we will discuss Password Recovery for Catalyst 2900-XL and 3500-XL.
Introduction
This document describes the password recovery procedure for the Cisco Catalyst Layer 2 fixed configuration switches 2900/3500XL, 2940 and 2950/2955 and the Catalyst Layer 3 fixed configuration 3550 switches.
Before You Begin
Conventions
For more information on document conventions, see the Cisco Technical Tips Conventions.
Prerequisites
There are no specific prerequisites for this document.
Step-by-Step Procedure
Follow the password recovery procedure below.
- Attach a terminal or PC with terminal emulation (for example, Hyper Terminal) to the console port of the switch.
Use the following terminal settings:
- Bits per second (baud): 9600
- Data bits: 8
- Parity: None
- Stop bits: 1
- Flow Control: Xon/Xoff
Note: For additional information on cabling and connecting a terminal to the console port, refer to Connecting a Terminal to the Console Port on Catalyst Switches.
- Unplug the power cable.
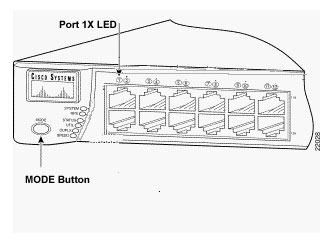
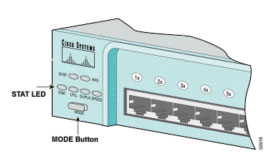
- Hold down the mode button located on the left side of the front panel, while reconnecting the power cable to the switch.
For 2900/3500XL and 3550 series switches: Release the mode button after the LED above Port 1x goes out.
Note: LED position may vary slightly depending on the model.
Catalyst 3524XL
For 2940 and 2950 series switches: Release the mode button after the STAT LED goes out.Note: LED position may vary slightly depending on the model.
Catalyst 2950-24
For 2955 series switches only: The Catalyst 2955 series switches do not use an external mode button for password recovery. Instead the switch boot loader uses the break-key detection to stop the automatic boot sequence for the password recovery purposes. The break sequence is determined by the terminal application and operating system used. Hyperterm running on Windows 2000 uses Ctrl + Break. On a workstation running UNIX, Ctrl-C is the break key. For more information, refer to Standard Break Key Sequence Combinations During Password Recovery.The example below uses Hyperterm to break into switch: mode on a 2955.
C2955 Boot Loader (C2955-HBOOT-M) Version 12.1(0.0.514), CISCO DEVELOPMENT TEST
VERSION
Compiled Fri 13-Dec-02 17:38 by madison
WS-C2955T-12 starting…
Base ethernet MAC Address: 00:0b:be:b6:ee:00
Xmodem file system is available.
Initializing Flash…
flashfs[0]: 19 files, 2 directories
flashfs[0]: 0 orphaned files, 0 orphaned directories
flashfs[0]: Total bytes: 7741440
flashfs[0]: Bytes used: 4510720
flashfs[0]: Bytes available: 3230720
flashfs[0]: flashfs fsck took 7 seconds.
…done initializing flash.
Boot Sector Filesystem (bs:) installed, fsid: 3
Parameter Block Filesystem (pb:) installed, fsid: 4*** The system will autoboot in 15 seconds ***
Send break character to prevent autobooting.!— Wait until you see this message before
!— you issue the break sequence.
!— Ctrl+Break is entered using Hyperterm.The system has been interrupted prior to initializing the flash file system to finish loading the operating system software:
flash_init
load_helper
bootswitch:- Issue the flash_init command.
switch: flash_init
Initializing Flash…
flashfs[0]: 143 files, 4 directories
flashfs[0]: 0 orphaned files, 0 orphaned directories
flashfs[0]: Total bytes: 3612672
flashfs[0]: Bytes used: 2729472
flashfs[0]: Bytes available: 883200
flashfs[0]: flashfs fsck took 86 seconds
….done Initializing Flash.
Boot Sector Filesystem (bs:) installed, fsid: 3
Parameter Block Filesystem (pb:) installed, fsid: 4
switch:!— This output is from a 2900XL switch. Output from a
!— 3500XL, 3550 or 2950 will vary slightly.- Issue the load_helper command.
switch: load_helper
switch:- Issue the dir flash: command.
Note: Make sure to type a colon ":" after the dir flash.
The switch file system is displayed:
switch: dir flash:
Directory of flash:/
2 -rwx 1803357 c3500xl-c3h2s-mz.120-5.WC7.bin!— This is the current version of software.
4 -rwx 1131 config.text
!— This is the configuration file.5 -rwx 109 info
6 -rwx 389 env_vars
7 drwx 640 html
18 -rwx 109 info.ver
403968 bytes available (3208704 bytes used)
switch:!— This output is from a 3500XL switch. Output from a 2900XL,
!— 2950 or 3550 will vary slightly.- Type rename flash:config.text flash:config.old to rename the configuration file.
switch: rename flash:config.text flash:config.old
switch:!— The config.text file contains the password
!— definition.- Issue the boot command to boot the system.
switch: boot
Loading "flash:c3500xl-c3h2s-mz.120-5.WC7.bin"…#####
#######################################
#######################################
File "flash:c3500xl-c3h2s-mz.120-5.WC7.bin" uncompressed and installed, entry po int: 0x3000
executing…!— Output suppressed.
!— This output is from a 3500XL switch. Output from a 2900XL, 2950 or 3550
!— will vary slightly.- Enter "n" at the prompt to abort the initial configuration dialog.
— System Configuration Dialog —
At any point you may enter a question mark '?' for help.
Use ctrl-c to abort configuration dialog at any prompt.
Default settings are in square brackets '[]'.
Continue with configuration dialog? [yes/no]: n!— Type "n" for no.
Press RETURN to get started.
!— Press Return or Enter.
Switch>
!— The Switch> prompt is displayed.
- At the switch prompt, type en to enter enable mode.
Switch>en
Switch#- Type rename flash:config.old flash:config.text to rename the configuration file with its original name.
Switch#rename flash:config.old flash:config.text
Destination filename [config.text]!— Press Return or Enter.
Switch#- Copy the configuration file into memory.
Switch#copy flash:config.text system:running-config Destination filename [running-config]?
!— Press Return or Enter.
1131 bytes copied in 0.760 secs
Switch#
The configuration file is now reloaded.- Change the password.
Switch#configure terminal
Switch(config)#no enable secret!— This step is necessary if the switch had an enable secret
!— password.Switch(config)#enable password Cisco
Switch#(config)#^Z!— Use Ctrl-Z.
- Write the running configuration to the configuration file with the write memory command.
Switch#write memory
Building configuration…
[OK] Switch#
I hope you found this article to be of use and it helps you prepare for your Cisco CCNP certification. Achieving your CCNP certification is much more than just memorizing Cisco exam material. It is having the real world knowledge to configure your Cisco equipment and be able to methodically troubleshoot Cisco issues. So I encourage you to continue in your studies for your CCNP exam certification.
- Issue the flash_init command.