Components of a Cisco Access Server
To configure a Router as an Access Server we first have to make sure that we the following two components
- An Asynchronous Serial Interface either built into the Cisco router or in an interface module.
Figure 1 shows a Cisco 2500 Series Router with two Asynchronous Serial Interface (SCSI II 68-pin)
Figure 2 shows a NM-32A/S Module that can be used in any supported Cisco Modular Router.
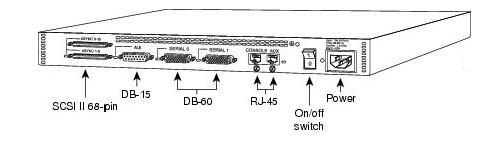
Figure 1
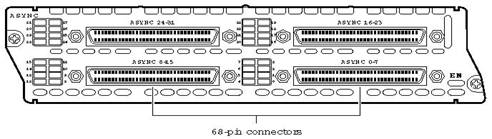
Figure 2
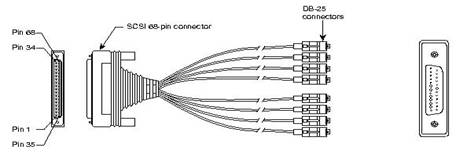
- CAB-OCTAL-ASYNC: This cable provides eight RJ-45 rolled cable async ports which can be connected to console ports of devices that need to be managed. The figure below shows an octal cable, one end of the cable that has 68-Pin connector is connected to async interface, the other end provides 8 RJ-45 cables to connect to console ports.
Configuring a Cisco Access Server
We will use Cisco 3640 with NM-32A/S as an Access Server in this article. The diagram below shows our network setup.
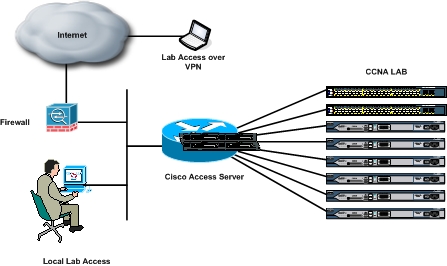
We are setting up an Access Server to access console ports of eight Cisco devices (two Cisco Switches and six Cisco Routers). We can also access these devices from anywhere over the Internet via Virtual Private Network (VPN) connection to Cisco ASA/PIX Firewall and then access the Cisco Access Server. The Configuration of Firewall is not in the scope of this article.
The most basic configuration is to define the TTY lines and allow telnet input into these lines.
Access-Server(config)#line 33 64
Access-Server(config)#transport input telnet
Access-Server(config-line)#no exec
Note – Please Refer to How Async Lines are Numbered on 3600 series Router document on Cisco Website in order to understand Async Line Numbering.
When we need console access to any device all we have to do is telnet to the line of that device. For example, our first line is connected to a Cisco 2800 Series Router. From our Personal Computer we can access this by using the following command from command prompt – telnet
The Final Configuration of our Access-Server is shown below
| Access-Server#Sh run
! Output-Omitted ! hostname Access-Server ! ! ip route 0.0.0.0 0.0.0.0 192.168.100.100 ip classless line 33 64 ! Output-Omitted !
|
The IP Host command is used for name-to-address mapping. From the Access-Server CLI we can access Cisco Devices by typing their respective hostname defined in the IP Host command instead of IP address followed by line number.
There are two ways to connect to devices attached to the Cisco Access Server. We can either telnet into the Access Server and then access each device from the Access Server CLI by typing the hostname of the device or by issuing the complete telnet command followed by the line number of the respective device we want to Access, Or we can open individual telnet session from our PC to the respective devices by issuing the telnet command and then the specifying the line number. When using the first method, if we want to get back to the Access-Server CLI to telnet other devices we must issue the escape sequence CTRL-SHIFT-6-X.
Today we covered an important tutorial in setting up an Access Server. Good Luck in Cisco Studies