An ACL consists of sequential series of statements known as an Access Control Entry (ACE). Each ACE specifies a matching criteria and an action which can be either Permit or deny. The matching criteria can be various things such as source/destination address or protocol such as TCP or UDP. For an individual ACE all configured matching values must match in order for that ACE to be considered as match. For example if an ACE is configured to match source IP address of 10.1.1.1 and destination IP address 172.16.1.1 then a packet must match against both of these for the ACE to be considered as a match. When the first match occurs, Access-List processing stops and the specified action is taken.
An ACL can be classified into two categories namely, Standard ACLs and Extended ACLs. Our focus will be on Standard ACLs in this lesson and we will cover Extended ACLs in the next lesson.
Standard ACLs: Standard IP ACLs follow a simple logic and can only filter traffic based on IP source address, network or subnet. They use only the source IP address in an IP packet as the condition test. All decisions are made based on the source IP address. This means standard access lists basically permit or deny an entire suite of protocols. They don’t distinguish between any of the many types of IP traffic such as WWW, Telnet, UDP, and so on.
A Standard ACL is created with the access-list command and then applied to the interface using the access-group command. Standard ACL syntax and description are shown below
|
Ciscoasa(config)# access-list access-list-number {deny | permit} source |
|
Syntax Description |
|
|
access-list-number
|
Identifies an access list by number as a standard or extended list. Also allows the creation and separation of multiple access lists.
|
|
deny
|
Denies access if the conditions are matched. |
|
permit
|
Permits access if the conditions are matched. |
|
source
|
Specifies the IP address/network to match on the source IP address of the Packet. Use the any keyword as an abbreviation for a source and source-wildcard of 0.0.0.0 255.255.255.255.
|
|
source-wildcard
|
(Optional) Wildcard bits to be applied to the source
|
|
log |
Causes an informational logging message about the packet that matches the entry to be sent to the console. |
In Cisco IOS the Standard ACLs can have numbers in range of 1-99 and 1300-1999. Standard ACLs should be applied close to the destination of the packets so that they do not unintentionally discard packets that should not be discarded. We will use the network depicted in figure below to explain this concept.
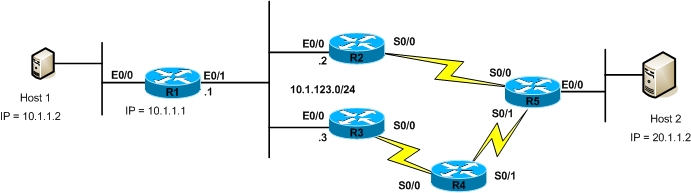
Our task is to configure the network such that host 20.1.1.2 cannot access 10.1.1.2, first we will create an access-list as shown below
R1(config)# access-list 10 deny 20.1.1.2
R1(config)# access-list 10 permit any
and then we will apply this access-list to an interface which will process incoming packets and if there is match it will drop the packets. If the access-list is applied on R5 e0/0 interface then all traffic from 20.1.1.2 will be dropped since Standard ACLs match only based on source address field, same goes with other routers like R2, R3, and R4. However if the access-list is applied the inbound direction on E0/1 interface of R1 we have much better control of what we specifically need to drop.
Configuration Examples
We can use Standard ACLs to implement different criteria of access control. For example in the illustration shown above we restricted host 20.1.1.2 from accessing the host 10.1.1.2. We can also use Standard ACLs to restrict a complete subnet, for example we can configure an ACL on R5 that denies packet coming from 10.1.1.0/24 subnet on S0/0 interface. The configuration to achieve this is shown below:
R5(config)# access-list 20 deny ip 10.1.1.0 0.0.0.255
R5(config)# access-list 20 permit any
R5(config)# interface serial 0/0
R5(config-if)# access-group 20 in
Moving ahead from the examples shown above, standard ACLs can also be used to restrict traffic to a router’s control and management plane. For example if we want to restrict Host 1 such that it cannot telnet R1, we can create a standard ACL and deny Host 1 in it and then apply to the VTY lines which control telnet access to the router. The configuration to accomplish this shown below
R1(config)# access-list 30 deny 10.1.1.2
R1(config)# access-list 30 permit any
R1(config)# line vty 0 4
R1(config)# access-class 30 in
This brings us to the end of this lesson in which we covered standard ACLs, in the upcoming lesson we will study indepth of Extended and Named ACLs and their configuration.