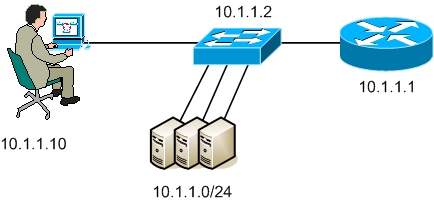
Figure above displays a simple network. The network administrator frequently accesses the router through telnet for various purposes specially for troubleshooting. But his concern is to restrict access to telnet so that no one else can access the router.
The configuration example shown below will restrict telnet access to the router and telnet will only be allowed from IP address 10.1.1.10 which is the IP address of administrator’s pc.
Router(config)#access-list 1 permit 10.1.1.10 0.0.0.0
Router(config)#line vty 0 4
Router(config-line)#access-class 1 in
An access-list is configured that permits 10.1.1.10 and denies all other hosts due to the implicit deny ACE. This ACL is then applied to the vty ports using the access-class command. Hence only 10.1.1.10 will be able to telnet the router and all other hosts will be denied.
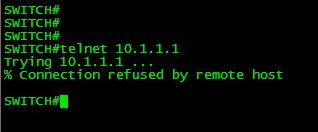
If we try to telnet the Router from Switch which has an IP address 10.1.1.2 the Router refuses the connection.
We can also add a deny all ACL with log keyword to see if other users/devices try to telnet the router.
Router(config)#access-list 1 deny any log
Now when we telnet the Router from Switch it will display the following message.

Outbound Telnet and SSH sessions can also be controlled from the router. In this case the access-list must be applied outbound using the access class command. An important thing to note here is that the source address portion of the standard access-list will now be used to match destination address. An example of this type of configuration is shown is below where an administrator can only telnet the Switch from the Router CLI
Router(config)#access-list 2 permit 10.1.1.2 0.0.0.0
Router(config)#line vty 0 4
Router(config-line)#access-class 2 out
In today’s lesson we learned how to control remote access to and from Cisco Routers. You must be aware such basic security options in Cisco IOS while preparing for Cisco CCNA Certification.