To configure voice features of device we need to activate voice dialog box by clicking to configure à telephony à voice in the feature bar of CCA tool. As shown in figure 1 below the initial screen of voice dialog box which will run through the UC500 series devices configuration.
Figure 1: CCA voice dialogue box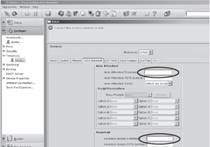
Now we will walk through the process of device configuration in voice dialog box as described below:
Step 1:
a. In the Auto attendant extension field enter 6001.
b. In the Auto attendant PSTN number field enter the auto attendant full E.164 number – for example 4445556001
c. click on the drop down box to select the script which will be used to create a menu tree for direct access to end users.
d. In the voicemail access extension field enter 6000, this number is the voicemail box number for the phone system. Dialing this number will call the voice mail system.
e. In the voicemail access PSTN number field enter full E.164 of the voicemail – 4445556000
Figure 2 illustrates how the AA and voicemail tab appear after the above step is completed
Figure 2: AA and voicemail tab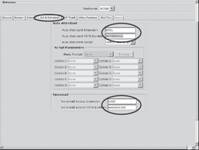
Step 2: Click the Device tab, shown in figure 3
Figure 3: Devices tab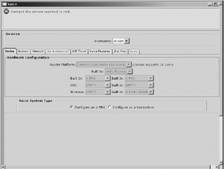
Most of the field is dull/grayed out, in case of voice system area – we need to decide on how we configure phone after a PBX or after a conventional key system. We will look at table 1 to see the differences in key systems and PBX configurations.
Table 1: key systems and PBX configurations
|
Key system configuration |
PBX configuration |
|
No classes of restriction (COR); all phones limited by PSTN capability |
COR is enforced on phone by phone basis |
|
Inbound calls directed to auto attendant always |
Inbound calls directed to an extension with DID or by using a custom FXO-to-DN mapping |
|
Outbound calls dialed by first choosing an open CO line |
Outbound trunk is determined by the system only |
Step 3: click configure as PBX radio button
Step 4: click the dial plan tab
In case system is selected to configure as key system the figure 4 illustrates how dial plan tab will appear
Figure 4: Dial plan tab in case of key system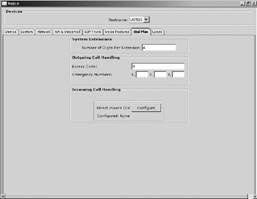
Step 5: On dial plan tab enter 4 in the number of digits per extension field
When we change number of digits from 3 to 4, the user tab will turn red and the AA and voicemail tab will turn green in color. This happens because the value for auto defined extensions appearing in user tab are only configured for 3 digits. Based on the values field in fields the smart assist macro will create the dial peers for PSTN access. For emergency field number doesn’t prepend the emergency number manually with access code in this field as when macro built the dial peers for emergency number it will prefix the number put in access field.
Figure 5 illustrates dial plan tab in case of PBX systems.
Figure 5: Dial plan tab in case of PBX systems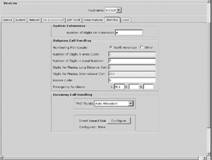
Step 6: In incoming call handling section, for the FXO trunks drop down box, choose auto attendant
This section of dial plan tab tells system what to do with calls inbound from the PSTN. The UC520 model example we are using in this lesson is configured with four FXO lines and doesn’t have any digital connections to the PSTN. In a PRI, E1 or T1 we need to configure settings for DID (Direct inward dialing). We have three FXO trunks options to choose from at this stage:
Operator – Choosing operator brings another field asking for supplying extension of operator
Custom configuration – manually mapping each FXO line to a separate number
Auto attendant – choosing this option means sending call to the number designated as auto attendant under AA and voicemail tab
For the current setup choose auto attendant
Step 7: click on voice features tab, as shown in figure 6 to enable the voice features we need and ensure that DNs entered confirm to four digital dial plans.
Figure 6: voice features tab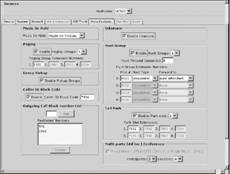
The voice feature tab is a busy tab and used to configure a large range of features form music on hold to hunt groups, we just click features which we want and enter the correct DN.
This concludes the lesson on configuring devices in UC500 series for voice communication, in the subsequent lessons we will learn about configuring other features like SIP trunking, network parameters, and user properties of CCNA voice exam on UC500 devices.