Telephony option in configuration menu is used to configure all parameters of the cisco unified communication 500 series devices as a phone system can be set. Settings for voice mail, SIP trunks, voice system features, user information, and network and internet parameters are configured from this menu option. Switching, routing, Smartports, & ports portions, addition of network interfaces, VLANs or static routing can be configured from this interface.
We can select DHCP server appropriate DNS settings based on SP requirement or incase customer or VAR need to change the default DHCP configuration. Figure 1 illustrates changing DNS in the “data” DHCP pool settings.
Figure 1: changing DNS in the “data” DHCP pool settings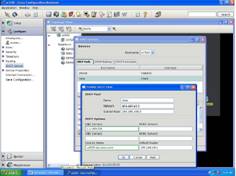
In order to change DNS settings for UC500 – click on Device Propertiesà IP Addresses – this is important if the SIP trunking provider uses domain names in place of IP addresses to route SIP calls between devices. Figure 2 illustrates default DNS settings for UC500.
Figure 2: Default DNS settings for UC500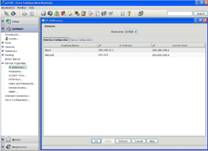
Click on Device Configuration tab in right pane and do the following:
Domain name: name the provider requires the UC500 to have.
Enable domain lookup: should be checked
Remove any old DNS server setting in the configuration.
New server: Enter IP address of DNS server and click Add.
Click Ok to continue at the bottom.
Figure 3 illustrates updated DNS settings for UC500
Figure3: Updated DNS settings for UC500
Click on Internet Connection in left panel and configure the WAN interface with proper WAN IP option. This is a must do step when using CCA tool for UC500 configuration. Click the FastEthernet0/0 interface and then the Modify button. In the below example a static IP is used (1.1.100.4), we can also use DHCP as well as PPPoE for DSL. Click OK to go back to Internet connection pane. Figure 4 illustrates WAN Connection setup screen. Click OK to continue.
Figure 4: WAN connection setup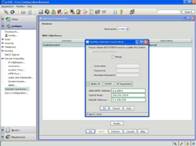
We can configure IP routing with default gateway with UC500. Click Routing from the left pane and click the FastEthernet0/0 interface and then click the Modify button. In the current example default gateway is 1.1.100.254. Figure 5 illustrates configuring IP routing.
Figure 5: IP Routing setup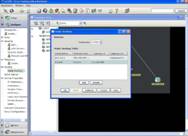
We can also setup security settings as HIGH, MEDIUM and LOW in firewall. The firewall settings can be set using CCA tool. Figure 6 illustrates setting firewall security to MEDIUM
Figure 6: Firewall settings (Security)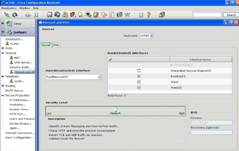
To ensure SIP traffic goes thru in case your used CCA 1.1 or earlier to configure this tab do the following:
Check the WAN interface configuration by running the show run interface FastEthernet0/0 command.
UC500# show run interface FastEthernet0/0
Interface FastEthernet0/0
Ip verify unicast reverse-path
Ip inspect SDM_MEDIUM out
Add the below via the command line interface:
UC500#config t
UC500(config)#interface FastEthernet0/0
UC500(config)#no ip verify unicast reverse-path
UC500(config)#interface integrated-service-engine 0/0
UC500(config)#no ip access-group 100 in
UC500(config)#interface loopback 0
UC500(config)#no ip access-group 101 in
UC500(config)#ip inspect name SDM_MEDIUM udp router-traffic timeout 300
Once this is done, then save the configuration settings as shown in figure 8 below.
Figure 8: Saving configuration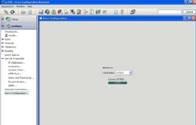
This concludes session on configuring networking parameters on UC500 series devices using CCA tool.