In preparation of your CCNA exam, we want to make sure we cover the various concepts that we could see on your Cisco CCNA exam. So to assist you, below we will discuss one of the more difficult CCNA concepts; Terminal Server Setup. As you progress through your CCNA exam studies, I am sure with repetition you will find this topic becomes easier. So even though it may be a difficult concept and confusing at first, keep at it as no one said getting your Cisco certification would be easy!
A terminal or comm server commonly provides out-of-band access for multiple devices. A terminal server is a router with multiple, low speed, asynchronous ports that are connected to other serial devices, such as modems or console ports on routers or switches.
The terminal server allows you to use a single point to access the console ports of many devices. Using a terminal server avoids the need for configuring backup scenarios such as modems on auxiliary ports for every device. You can also configure a single modem on the auxiliary port of the terminal server, thus providing dial-up service to the other devices during a network connectivity failure.
This document shows how to configure a terminal server to access only the console ports on other routers using Reverse Telnet. Reverse Telnet allows you to Telnet out from a device you are telnetting from, but on a different interface. For more information on Reverse Telnet refer to Establishing a Reverse Telnet Session to a Modem.
Cabling
The Cisco 2509 – 2511 series routers use a 68-pin connector and breakout cable. This cable (CAB-OCTAL-ASYNC) provides eight RJ-45 rolled cable async ports on each 68-pin connector. You can connect each RJ-45 rolled cable async port to the console port of a device. The 2511 allows for a maximum of 16 devices to be remotely accessible. In addition, the NM-16A or NM-32A high density async network modules are available for the Cisco 2600 and 3600 series routers to provide the same function. For more information on cabling refer to the Serial Cable Guide and the Cabling Guide for RJ-45 Console and AUX Ports.
Note: The async ports from the 68-pin connector are data terminal equipment (DTE) devices. DTE to DTE devices require a rolled (null modem) cable and DTE to data circuit-terminating equipment (DCE) devices require a straight-through cable. Since the CAB-OCTAL-ASYNC cable is itself rolled, you can connect each cable directly to the console ports of devices with RJ-45 interfaces. However, if the console port of the device you are connecting to is a 25 pin interface (DCE) use the RJ-45 to 25 pin adapter marked “Modem” (to reverse the “roll”) to complete the connection.
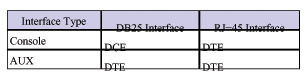
Port types for console and auxiliary ports on Cisco routers and switches are:
Design Strategy
Configure the terminal server so that it is accessible from anywhere by giving it a registered public Internet address, and by locating it outside the firewall so that firewall issues will not interrupt your connection. This ensures that you can always maintain connectivity to the terminal server and have access to the connected devices. If you are concerned about security, you may want to configure access lists to only allow access to the terminal server from certain addresses. You can also configure server-based authentication, authorization, and accounting (AAA) such as RADIUS or TACACS+ for a more robust security solution. For more information on AAA refer to the Cisco AAA Implementation Case Study.
You can configure a modem on the auxiliary port of the terminal server for dial backup in the event your primary connection (through the Internet) goes down. This eliminates the need to configure a dial backup for each device, as the terminal server is connected through its async ports to the console ports of the other devices. For more information on connecting a modem to the AUX port, refer to Modem-Router Connection Guide.
Use the ip default gateway statement pointing to the the next hop router on the Internet. This allows you to have connectivity to the terminal server through the Internet even if routing is not enabled. For example, the terminal server is in ROM monitor (ROMMON) mode as a result of a bad reboot after a power outage.
Configure
In this section, you are presented with the information to configure the features described in this document.
Note: To find additional information on the commands used in this document, use the Command Lookup Tool ( registered customers only).
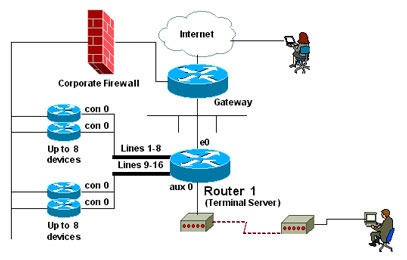
Network Diagram
This document uses the network setup shown in the diagram below.
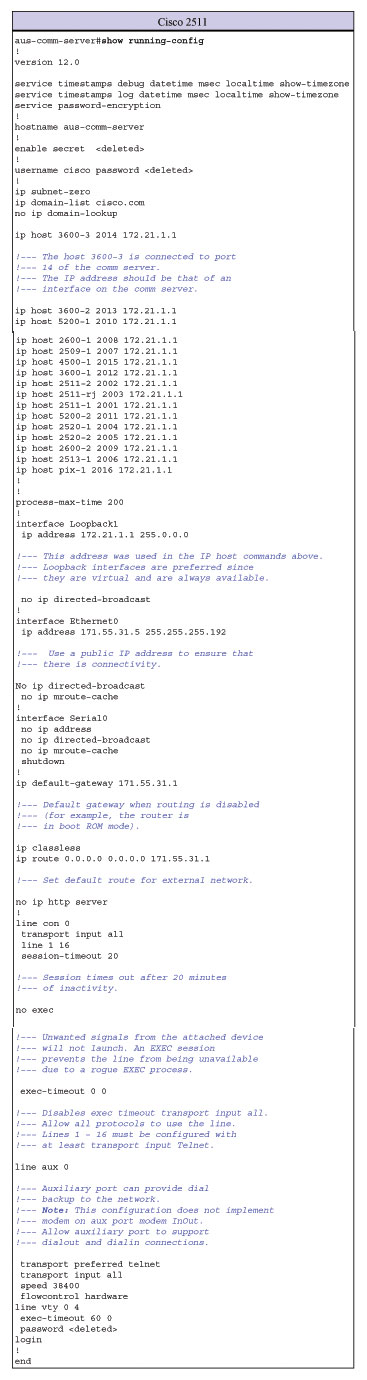
Configurations
This document uses the configuration shown below.
Command Summary
ip host – Used to define the static host’s name-to-address mapping in the host cache. To remove the name-to-address mapping, use the no form of this command.
- ip host name [tcp-port-number] address1 [address2…address8]
- name – Name of the host. The name field does not have to match the actual name of the router you are trying to connect to, but it should be a name you would want to use in the reverse Telnet. By using this command and the name field, the user does not have to know the actual port number of the remote device.
- tcp-port-number – TCP port number to connect to when using the defined host name in conjunction with an EXEC connect or telnet command. In our example configuration, we are using a reverse Telnet so the port number must be 2000+line number.
- address1 – Associated IP address. In our example configuration, we use the loopback IP address.
transport input – Used to define which protocols to use to connect to a specific line of the router.
- transport input {all | lat | mop | nasi | none | pad | rlogin | telnet | v120}
- all – Selects all protocols.
- none – Prevents any protocol selection on the line. This makes the port unusable by incoming connections.
- none – Prevents any protocol selection on the line. This makes the port unusable by incoming connections.
Note: In our configuration example, the async lines use the minimum configuration of transport input telnet so you can Telnet to the devices on the async line.
telnet – This EXEC command is used to login to a host that supports Telnet.
- telnet host [port] [keyword]
- host – A host name or IP address. This can be one of the name fields defined in the ip host command as shown above.
- port – A decimal TCP port number; the default is the Telnet router port (decimal 23) on the host. For the reverse Telnet, the port number must be 2000+line number. Line numbers would be from 1-16 in our configuration. Use the show line EXEC command to see the available lines.
Switching Between Active Sessions
To switch between active sessions you must:
- Escape from the current session by using the escape sequence Ctrl-Shift-6-x.
- Display all open connections use the show sessions command.aus-comm-server#show sessions
Conn Host Address Byte Idle Conn Name
1 2511-1 171.69.163.26 0 0 2511-1
2 2511-2 171.69.163.26 0 0 2511-2
* 3 2511-3 171.69.163.26 0 0 2511-3
Note: The asterisk (*) indicates the current terminal session. - Enter the session (conn) number to connect to the corresponding device. For example, to connect to 2511-1 type 1 which is the connection number. However if you hit the return key, you are connected to the current terminal session, which in our case is router 2511-3.
Terminating Active Sessions
To terminate a particular Telnet session:
- Suspend/escape from the current session. To suspend a Telnet session, enter the escape sequence Ctrl-Shift-6-x. Note: Ensure that you can reliably issue the escape sequence to suspend a Telnet session. Some terminal emulator packages have difficulty sending the correct sequence, Ctrl-Shift-6, x.
- Display all open connections using the show sessions command.
- Disconnect the desired session using the disconnect [connection] command.
Verify and Troubleshoot
This section provides information you can use to confirm your configuration is working properly.
Certain show commands are supported by the Output Interpreter Tool ( registered customers only) , which allows you to view an analysis of show command output.
Note: Before issuing debug commands, please see Important Information on Debug Commands.
If you cannot connect to the router of your choice using a name configured in the ip host command check:
- That the port address is configured correctly.
- The address (interface) used for the reverse Telnet is up/up (from the output of show ip interface brief). That’s why its good to use loopbacks since they are always up.
- Verify that you have the correct type of cabling. (For example, if you use a crossover cable to extend the length, it may not work.) Refer to the Cabling section above for more detail.
- Test direct connectivity by telneting (from both an external device as well as from the terminal server) to the IP address port (for example, telnet 172.21.1.1 2003)
- Verify that you have the transport input telnet command under the line for the target device (the device connected to the terminal server).
- Try connecting to the target router’s (device connected to the terminal server) console directly (using a PC/dumb terminal) to test if it’s a port issue.
- If you get disconnected, check timeouts (you can remove or adjust them).
- If you encounter authentication failures, remember that the first authentication (if configured) is by the terminal server, while the second authentication (if configured) is by the device you are trying to connect to. Verify that AAA is configured correctly on both the terminal server and the connecting device.
- If you type the full hostname again after initially opening the connection, you will see this message:
Access_server#r1Trying R1 (100.1.1.1, 2001)…% Connection refused by remote host
The connection is refused because you already have an open connection to that router.
- There’s one more important part of an access server config your CCNA / CCNP home lab will need:line 1 8
no exec
transport input all (if you forget this line, you may receive % Connection refused by remote host errors)
The line numbers may differ according to your access server, but “no exec” is very important here. This will stop rogue EXEC sessions from refusing connections that it shouldn’t be refusing. Without this command, you’ll commonly see “connection refused by remote host” when you shouldn’t be. That message is the most common error you’ll see on an access server, and it’s there because you already have an open connection or you left “no exec” out of your configuration. “No exec” isn’t mandatory, but it will help you keep your sanity!
We hope you found this Cisco certification article helpful. We pride ourselves on not only providing top notch Cisco CCNA exam information, but also providing you with the real world Cisco CCNA skills to advance in your networking career.