In preparation of your CCNA exam, we want to make sure we cover the various concepts that we could see on your Cisco CCNA exam. So to assist you, below we will discuss something you will definately need to be able to do in your CCNA lab; Connecting your PC to your Cisco Switch or Router. So since this is probably one of the first tasks on your way to your CCNA certification, let me congratulate you on taking the first step to advance your networking career with a Cisco certification!
Connect a PC to a Cisco Router or Switch
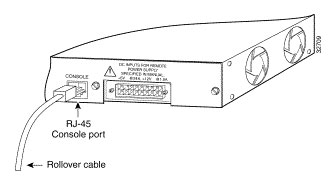
Use the supplied rollover cable and the DB-9 adapter to connect a PC to the Cisco console port. The PC or terminal must support VT100 terminal emulation. The terminal emulation software—frequently a PC application such as Microsoft Windows HyperTerminal or Symantec Procomm Plus—makes possible the communication between the switch and your PC or terminal during the setup program.
Follow these steps to connect the PC to the Cisco unit:
- Connect the 9 pin to RJ-45 adapter to the console cable.(Depending on my source for the console kit, you may already have this step done for you as sometimes I get one piece console kits.)
- Connect the 9 pin adapter to COM1 on your PC(If your PC only has USB ports and does not have a 9 pin serial port, you will need to purchase a USB to 9 pin serial converter). We now actually recommend our FTDI console cable and no longer stock the converter cables. Here is a link to check those out, they are awesome! FTDI Console Cable
- With the supplied rollover cable, insert the RJ-45 connector into the console port.
- Launch HyperTerminal and name the console session.
- Select COM1 as your “Connect Using” port(make sure you connected the console cable to COM1 on your PC.
- Configure the baud rate and character format of HyperTerminal to match these console port default characteristics:
o 9600 baud
o 8 data bits
o 1 stop bit
o No parity
o NO FLOWCONTROL - Turn the Cisco unit on and now you should see the boot process in HyperTerminal of your unit.
- Press ENTER to connect to your Cisco unit. This will bring you in User mode.
- At the router> prompt, type in a question mark (?) This will list all the User mode commands. Feel free to play with all the available commands. You are in a safe zone.
Nothing will be damaged. - Press the Enter key to the view the commands line by line.
- Press the SPACEBAR to view the commands a full screen at a time.
- Type enable or en, the press ENTER. This will put you in Privileged mode, where you can change and view the router configuration.
- At the router# prompt, type a question mark (?) This will list all available commands in the Router Global configuration mode. Use these commands with cautions.
- Type config and ENTER.
- Press ENTER to configure your router using your terminal.
- At the router(config)# prompt, type another question mark (?) This will list all commands available in router configuration mode. Use these commands with cautions.
- Press the CONTROL key and the letter Z at the same time. Notice how the take you out of Configuration mode and brings you back in Privileged mode.
- Type disable. This will put you into where you begin – the User mode.
- Type exit, which will log you out of the unit.
We hope you found this Cisco certification article helpful. We pride ourselves on not only providing top notch Cisco CCNA exam information, but also providing you with the real world Cisco CCNA skills to advance in your networking career.