Today we are going to review some of the common cables you may find in your Cisco Certified Network Associate 200-125 (CCNA) or Cisco Certified Entry Networking Technician 100-105 (CCENT) home lab so you can connect to your Cisco router or Cisco switch. Straight-through, crossover, rollover, console, and many more terms can be pretty confusing to someone just breaking into the networking field and looking to get their feet wet and build their own lab. So our goal today is to take some of the mystery out of these cables names and explain what each one does so you can make sure you have the right cables to get your started in your Cisco Certification CCNA home lab.
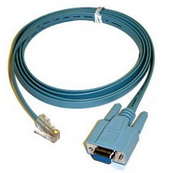
So the first cable we will cover is the Cisco Console Cable or sometimes called a Cisco Console Kit.

Cisco Console Cable
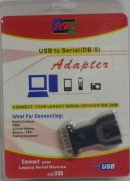
Today these are primary a one piece cable that on one end has a 9 pin serial end that will plug into a 9 pin serial on the back of your computer. The other end which is an RJ-45 cable will plug into the console port on the Cisco router or Cisco switch you are going to configure. Simple enough, right? So here is where it gets a little confusing. Most computers now days do not have a 9 pin male serial port on it. So how the heck do you plug this console cable into your computer? Well, you will need a USB to 9 pin Serial Converter. Here is an example of one on our site.

USB to 9 Pin Serial Adapter
Then when you put these two peices together you will be fine and able to console into your Cisco router or switch. So to recap, in this scenario you will have a usb cable come out of a USB port on your computer, it will go into the right side of the USB to serial adapter above. Then the 9 pin male part will connect to the 9 pin female port of the console cable and the RJ-45 end of the console cable will go into the console port on the Cisco device!
Now a common mistake some people make is they look at the back of their computer and they see a 9 pin female video port on the back and assume that is a serial port. The way you can tell the difference is the serial port is male on the back of the computer and the video port is female.
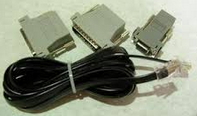
One other historical note on the Cisco console cable. In the olden days (roughly 5 to 17 years ago), the console cable was called a Cisco Console Kit. Why? Well because it was actually two pieces instead of the one nice molded piece you see above. It used to be a 9 pin or 25 pin adapter and then you had to use a special rollover cable that we will discuss in more detail later that you plugged into the 9 pin or 25 pin serial adapter. You can see an example below. But it is getting exceedingly rare for you to see these now days.

Old Style Cisco Console Kit
So sticking with the concept of connecting to the Cisco router or Cisco switch, let’s discuss the rollover cable that we touched on above. This is a cable with a special pin-out which rolls all the cables over from one end to the other. So pin 1 on connector A goes to pin 8 on connector B; pin 2 to pin 7; pin 3 to pin 6; etc. You can see a diagram of it below.

Rollover Cable Pinouts
So what is this cable used for? As mentioned, it can be used with the serial adapter to create a complete console cable. The other thing this cable can be used for is your access server such as a 2509-RJ or 2511-RJ access server router. On the back of the Cisco 2509/2511-RJ router it will look like either 8 or 16 RJ-45 ports as shown below.

Back of Cisco 2509-RJ Router
You will put a rollover cable into that port and then the other end will go into the console port on the Cisco router or Cisco switch that you are looking to access and configure. Please note, this only applies to the RJ version of the 2509 and 2511 routers. As the non-RJ version uses an octal cable.
Ok, so now you pretty much know about the various cables you can use to connect to your Cisco device in your CCENT or CCNA home lab. But wait, Cisco has to make it a little more confusing by introducing another change to the console cable.
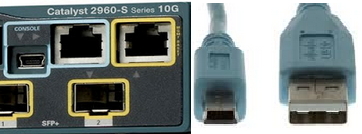
As noted above, it is a pain in the neck to build a console cable by putting a USB to serial converter and a console cable together. It just does not make any sense. So what Cisco has done recently with their newer model routers and switches (most of which you will not have in your CCNA lab as they are way too expensive as of right now), they are including two console ports on these devices. They will have a standard RJ-45 style console port so you can create you console cable and they also are including a USB mini-B console port on these devices. You can see a picture of the two console ports on a Cisco 2960-S switch below as they have the light blue outline around them and this special USB A to USB mini-B rollover console cable to the right of it.

Mini-B USB Console Port & Cable
This one piece cable is obviously more convenient to use, but is only an option on newer Cisco devices. So you may still have to carry multiple console cables depending on the device you are going to console into.
Finally, I will not go into great detail here on this, but I will mention it as a footnote. One thing we see students struggle with on occasion is the drivers for the USB to serial converters. The main issue we see is that if you have a usb to serial adapter that uses a counterfeit Prolific chip, you may see an error code 10. In that case, you may want to get another usb to serial converter and save yourself a headache of making it work.
If you need some help building your lab, please use the Contact Us link in the upper right hand corner and we will be more than happy to help you!
We also have our helpful lab suggestions here.
